Integration Host
Continue to Part 2
Welcome to the Integration Host Getting Started tutorial.
Here we’ll try and get you creating integrations right away. We’ll give you a foundation of the concepts and point you in the right direction to grow your skills.
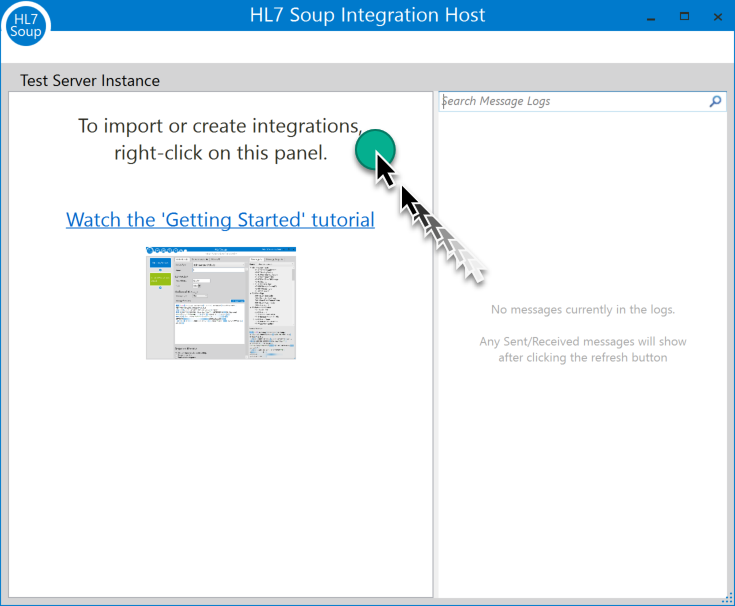
We’ll start in the Integration Host Client, which is loaded following the installation. I’ve already created my trial license and pasted in the code, and it’s ready to begin. We won’t stay on this screen too long though as it doesn’t offer us much until we have some processes running. We’ll, therefore, follow the instructions on the screen and right-click on the panel on the left and select ‘New’ to create a new workflow.
This is the Integration Workflow Designer, where we define the steps needed to achieve our goals. I’ll take you through it by creating a couple of examples. We’ll start with a simple conversion from an HL7 file to a CSV file.
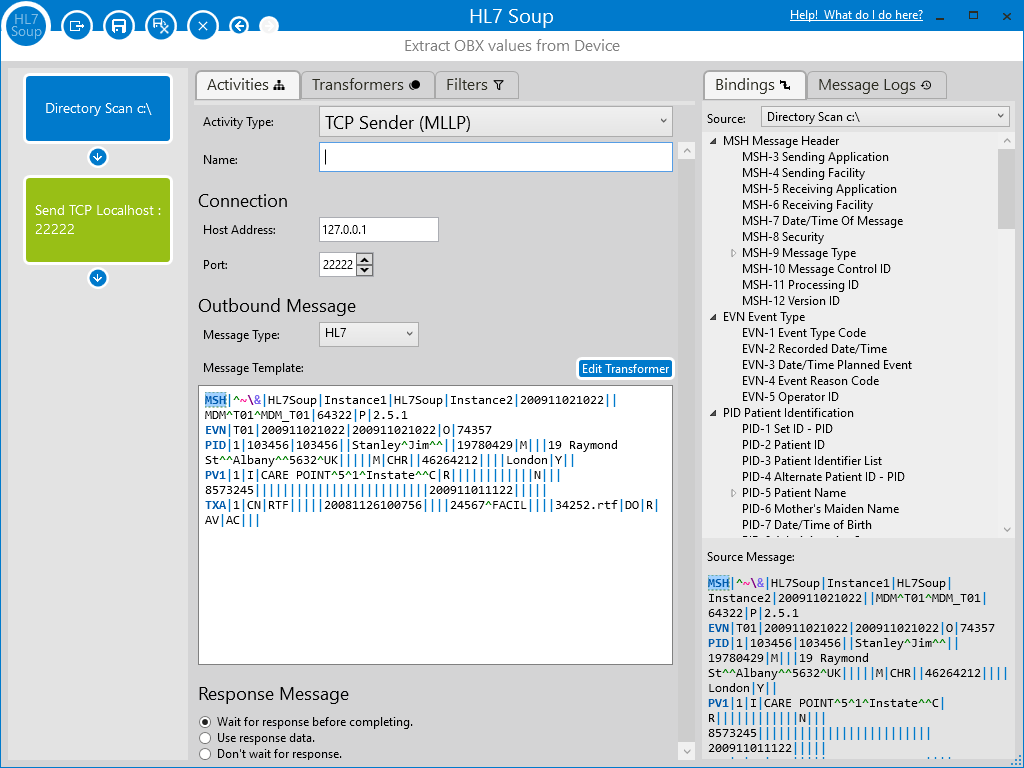
See this left panel here. This lists all the steps to be executed by your workflow. As this is a new workflow, it’s started us off with the first activity. In the centre panel, we see the details of the activity. The first activity always defines how the workflow is started and where it gets its data. By default, it’s configured to receive a message over TCP, specifically using the MLLP protocol which is the standard for HL7. If you expand the ‘Activity Type’ drop down you’ll see that there are many other ways we could get our data, such as reading from a database or listening for HTTP or SOAP web service requests, but in this sample we’ll select the ‘Directory Scanner’ as we want to monitor the file system for incoming HL7 files.
I’ll start by giving the activity a helpful name {Get HL7 Files}, then change the directory that we monitor to “c:\ExampleOne”, that’s where we’ll place HL7 files for processing. By default, you can see that we’re going to be scanning our directory for any file with the extension ‘.hl7’, we’ll keep that as it suits our workflow.
We’ll configure it to keep monitoring this directory for new files even after all files in it have been converted, and we’ll have it delete the processed hl7 files as we go.
The ‘Message Type’ tells the system what type of data to expect, the default of HL7 suits us nicely, but you can see there is an extensive list of data types available.
Lastly, we provide a ‘Message Template’. A message template is an example of what the message will look like. It doesn’t need to be real data, just something with the structure of the messages you are expecting to receive. Its purpose is to guide you while mapping your data. Let me show you by pasting in an HL7 message that I copied from the HL7 Soup editor samples {I’ve used message 4}.
Look over here on the right. The Bindings panel has been populated with a tree structure representing this message. Expanding the tree digs deeper into the data. We’ll use this in the following steps to create our conversion. But first, let’s create the second step in our workflow.
Adding a step is just a matter of clicking on this button on the workflow panel. It drops another activity. Just like with the proceeding activity, we’ve got a default activity type, one that sends a message using TCP. Hitting the dropdown shows we’ve got plenty for options for processing the data, such and writing it to a database, sending it to different types of web services, or even processing it with c# code. But we’ll be writing this data to a file, so we’ll select the “File Writer”.
I’ll give this activity a nice name. {Create CSV File} Following that, I’ll configure a place to write the file while it’s being constructed {c:\ExampleOne\MyCSV.csv}, then how many rows of data we want in the file. For a CSV it’s common to have many records in a single file, so a high number is suitable. But if you were writing to XML, for example, then you’d set this to 1 and have just a single record per file. Since our CSV files will have multiple rows, well have it moved off to another directory once we’ve finished all the processing This prevents the file being tampered with by other processes until it’s completely populated. I’ll show you the effects of this shortly.
Let’s change the message type to CSV and set the message template.
Before we change the message template though, I want to point out that by default, an activities message template is bound to the message received by the first activity. In other words, the message sent to the workflow will be the same fundamental message coming out. This is great when you need to rectify the data or forward it on verbatim. But, we are going to convert to an entirely different message type, so we’ll delete this binding and start from scratch.
In activities beyond the first, the Message Template not only creates the message structure, but also it’s used to construct the message going out. Let me show you this by creating the CSV by dragging in fields from the Binding Tree.
I’ll bring in the Patients ID Number, as well as their First Name, Last Name, and their Date of Birth. Note that I’m just dragging the fields to the end of the message and the system is helpfully putting in the commas for me.
I’m also going to quickly include the patient's ID in the filename too.
Each of the fields is now represented by variables that will change their value with each message. Variables are just values stored in memory, that can be updated and used in the workflow. They can be inserted into messages and text using this ${VariableName} syntax and will be replaced at runtime. We’ll go into this further soon, but for now, let’s go ahead and run this workflow so you can see what I mean.
I’ll quickly change the name of the workflow from the defaults to “Example One (Converting HL7 to CSV)”, then click the ‘Save and Close’ button.
Here we are back in the Integration host client. You can see now that our workflow has been added to the list of integrations, and we can see it is already running. So now we just need to provide it with data to try it out.
I’ll navigate to my ExampleOne folder, and here you’ll find I’ve prepared this ‘Samples’ directory where I’ve saved some sample HL7 messages to test with. Now all I need to do is copy this file to my clipboard and paste it into my processing folder.
If you look at the client, you’ll see the count of messages processed shown in real-time. I can keep pasting in the sample files, and it will continue to process them.
Looking in the file system, you’ll see it’s still constructing the CSV. Remember, our configuration stated that it should have 5000 rows in the file before shifting to the Outbound directory? We could keep pasting {almost 500 times}, but it’s easier to just stop the workflow running by right-clicking it and selecting “Stop”. It will now close off the construction file and shift it to the outbound directory, giving it a unique name.
I can now open it up and see that we have indeed created a CSV file from the data. It’s looking OK, but I can see a few problems here. I don’t like that some of the Names are all in capitals like “SARAH CAMP”, and these dates are still in the almost unreadable HL7 date format. Let’s go and fix these up.
We’ll use the message logs to diagnose the problem a little. Click on the refresh button to show the current logs. You can see here a row representing each message that was processed by our workflow, at what time it was processed, and how long processing took.
Click an item, and you’ll see it expands showing you each of the activities and the messages processed. You can also see the values of the variables.
I’ll search the logs for “Sarah Camp”, and we’ll see what went wrong there.
It seems our incoming data is a bit inconsistent, sure enough, her name is all in capitals. The date is in the valid HL7 format, but that’s no good for Excel. Let’s double click on the integration and edit the workflow to fix these problems.
Navigate to the second activity, and locate our variables in the message template. A handy feature of Variables is they can easily be formatted by right-clicking on them and selecting a format. Dates are simple. I’ll select my computers short date format. The names are simple too. I’ll select title casing for the patients given name {Capital first letter, then lowercase}, and then the McName format for their Family Name. McName formatting will make sure names like McDonald get the capital D correct, it’s similar to title casing, but with magic.
Let’s save the workflow, start it back up, and drop another sample HL7 file in the processing directory. I’ll stop the workflow, and we can look at the data. Perfect, the names have the correct casing and Excel now even recognised the dates as dates.
Hopefully, that was all reasonably straight forward. Now we’ll edit this again an expand on some of the concepts.