Convert XML To HL7
Conversion Steps from XML to HL7
Welcome to this detailed guide on converting XML files to HL7 messages using HL7 Soup's Integration Host. Follow these steps to set up your environment and begin the conversion process efficiently.
-
Install the Integration Host
Begin by downloading and installing the Integration Host from HL7 Soup. You can start with a 30-day free trial, or if you're just experimenting, you might prefer the free development license.
-
Set Up Your Directory Scanner
Configure the directory scanner to automatically pick up XML files from a specified folder for conversion. This setup will continuously monitor for new files to process.
-
Define XML as the Input Type
Specify that the incoming message type is XML to ensure the correct parsing and processing of the data within the Integration Host workflow.
-
Map XML to HL7 Format
Use the Integration Host's workflow designer to map fields from the XML file to the appropriate segments and fields in the HL7 message format. This step is crucial for accurate data conversion.
-
Automate and Monitor the Output
Set the workflow to automatically convert and output each processed XML file into a new HL7 file. Monitor the output in the designated 'Out' directory and verify the conversion accuracy.
By following these introductory steps, you'll be equipped to automate the conversion of XML files into HL7 format, utilizing the powerful features of HL7 Soup's Integration Host.
Video Transcript
In this tutorial we're going to show you how to convert from XML to HL7. I have the sample files here; there are an XML file and the HL7 file that we're going to convert it into. I'll include a link to these if you want to download these for yourself and follow along. Both files have a similar hierarchical structure but are not related formats. The bad news is that there’s not an automagical conversion between the two, we're going to need to map them together. I'm going to show you how to create an automated conversion so all you need to do is drop an XML file into a directory and it spits out an HL7 file. This is going to be very easy because we're using HL7 Soup’s, Integration Host. Follow along with the 30-day free trial, or if you're training, teaching, or just want to play, there's also a free development license available. So here is Integration Host. This main screen is the dashboard used to monitor your conversions, but before we can, we first need to create a conversion. We just right-click on the left-hand panel and select new to load up the workflow designer and define our conversion. There is so much you can do with the workflow designer that goes well beyond the scope of this video you can connect all sorts of medical hardware-software together, TCP, web services, databases, all that sort of stuff. If you'd like to know more then take a look at our getting started tutorials using the link at the top right of this video. But now we're just going to dive right in.
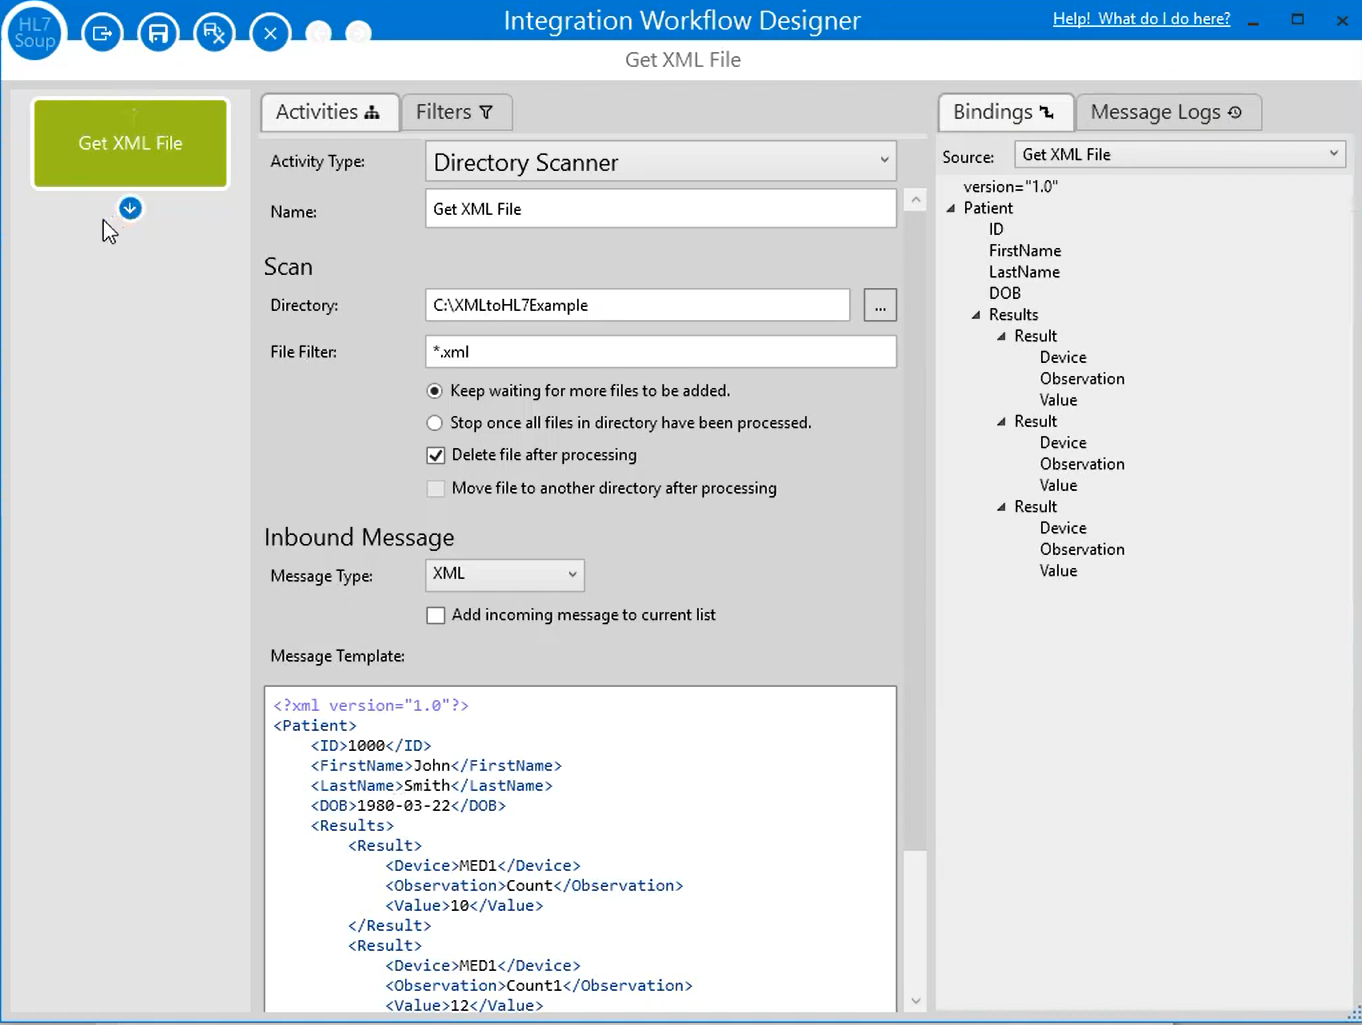
So to begin with, I'm going to have to define how to receive my XML message. I'm going to select a directory scanner as I want to pick it up as a file, and I'll call it "Get XML file". I already have a directory that I want to get the data from; it's this C:\XMLToHL7example. So that is the directory to scan for our XML files. We're going to be looking for XML files, so I'll change the file filter. I'll leave the setting "keep waiting for more files to be added" on because we want this to be a permanently running process. In my case, I'm just going to delete the file once we're finished processing, but I could move it elsewhere if I wanted to. Now we set the message type to be an XML message, and finally, we just want to include that XML message into the message template. You can see up on the right now it gets the structure from that message. Very helpful when we're mapping the messages together.
Now we've defined where we get the data from we need to add another step into our workflow. I'm going to write it out as a file, and I'll name it appropriately. Now I just need to define how I'm going to name the file. I'm going to use that same directory I used before, and I've got an “Out” directory inside of that, so that's where I want it. In this example, I want to create a new HL7 file for every XML message that comes into the system, so I need to give it a file name like so. Now I can just insert into the file name a variable called the WorkflowInstanceID. It's an ID that increments with each message. It will make sure that each of the files has a unique file name. I, therefore, want to set the maximum records per file to 1, so it creates one message per file.
Now I add in my HL7 file as the message template. This is just a message I took from the HL7 Soup samples. There's a whole lot of different HL7 message types there if you want to base yours on those, otherwise, if you can get your hand on the actual HL7 message that's going to be the best.
If you don't know your way around HL7 messages, make sure you have a look at some of my other tutorials where we go through the basics of using HL7 and load up the HL7 Soup editor. It's a great help navigating these files.
If you look at the message, we've got our standard message header, we've got some patient information, and we've got some results information. Here is where we will map in these XML values, and as you can see, there's just a little bit of patient information, and we've got some repeated result values as well. So we need to drag in the appropriate fields from the XML message into the HL7 message. Let me show you how that is done. I'd like the patient to be dragged here, so I'm just going to drag that field in from the structure created from the XML message. It automatically creates a variable placeholder in the message. The idea is we're creating these locations inside the message that are going to be swapped out at runtime with the other values. The remaining message template will just be left there at runtime. So for instance, the sending application, facilities details, we're just going to hard code that into the message template.
Let's bring in some more of these values — the first name. So notice as I move the mouse over the message I can see exactly where in the message I am, I know where to drop the binding. That's my first name, last name, and the date of birth into the appropriate locations. I don't have the gender for this one so I'll remove that field. I'm also going to remove all of these OBX values as we don't have a one-to-one mapping here. We're will need to generate an OBX value for each instance. So, for now, I'm just going to remove all this additional stuff to simplify it for this demonstration.
What else would need to be done? We probably want to change the date/time in the message, so let's insert a variable. We'll insert the current date-time, and we're going to format that as well, so we right-click and select format date. We're going to format it as an HL7 date, and I want to include the time up to the seconds. For the message control ID, we're going to insert the variable called WorkflowInstanceID. That's just our incrementing value so each message will have a unique ID. All the other stuff, the version number, that's all great, I'm happy to keep them.
Okay, so that was super simple. If all you have is a conversion with the one-to-one mapping, then that's all you need to do, you'd be pretty much up and running. However, in this example, we have got a repeating value, so I'll just quickly go over the requirements for doing that. We have multiple results, so what we need to do is loop over those results and add in a new OBX value for each one of them. So how do we do that? Well, we need to go into the Transformers section of the activity.
Transformers represents the mappings from one system to the other. As we dropped in the bindings into the message earlier, it was creating variables in the background that would be populated in the Transformers. Alternatively, we could have bound the fields by dragging the items from the source tree into the destination tree. Our getting started tutorial goes into this in a lot more detail.
We going to loop over the results, so we want to add a new transform and step after this one. I right-click into the Transformers list, and I'm going to choose a For Each transformer, that allows us to loop over repeated items. Now we need to configure we want to loop over all of these results values. All I need to do is drag the first value into there, and now we've said we want to loop over every result in this message. I'm going to take all the values out of each result and put them into variables so I can use those in the message. All I do is drag the value into the Transformers list, and it created as a variable. For each of those results, I am going to append a segment into my message, and we want the source path to be the value of the OBX message. I can literally type in that segment now. OBX||, and at this point, I can start inserting the variables that I've used. I’ll put my device here, a couple more pipes, and insert the value, and the observation.
You can see we are creating variables for each of the result values and then appending into the HL7 message an OBX value for each one.
That's our workflow created; it's given nice name "Convert XML to HL7". I'll save and close this workflow.
If we take a look at the Integration Host, we now have the workflow sitting there, and it's in a running state, so let's give this a try. I'll go back to this directory, and I'm going to take my sample XML message, copy that, and place it into the directory that's been monitored. We see it's deleted out afterwards. If I now go to the out directory we can see our created HL7 message with its unique file name, and if I double click on that and take a look and we could see sure enough here's our generated HL7 message. It's got the correct dates all those details are correct; the patient has been brought across. There's the wrong format for the patient's birthdate, but it has at least got the value. We'll fix that in a second. Here's each of our results and they've gone in as we defined, so that was great. Let me just quickly fix up that date in the workflow.
I can now edit the workflow pattern by double-clicking, and we'll head back to where the birth date was written. This is a straightforward fix I just need to right-click on the patient's date of birth, change the formatting for a date of birth, we wanted it to be an HL7 date. Here is a chance to rerun it. I can go back to my directory and paste in another file. You will see the new messages being created. Double click and great, the data is now in the correct format.
Also worth noting is the logs that have been generated for each instance. We can view inside those and have a look at the details of all the messages we created. If we have any debugging that we need to do this is a great place to do it.